Table of Contents
FAQs
User Guide
Administrator Guide
Administrator – Getting Started
FAQs
Why am I not receiving messages?
Verify your profile is setup correctly by checking the following:
• You have entered a correct email address.
• You have entered a correct mobile telephone number for receiving text messages.
• You have entered a correct voice telephone number for receiving voice calls.
• You have the correct Do Not Call Times set for delaying voice messages.
Why have I stopped receiving text messages?
You may have accidentally replied STOP to a text message from QuikKast. Replying STOP is the method for denying text messages from the sender. Simply text START to your organization’s assigned phone number in order to enable receiving text messages from QuikKast. See your organization’s QuikKast admin for help with obtaining the phone number. If this does not remedy the problem be sure to check your profile.
Why am I not receiving messages from a group I joined?
Although you requested to join a group, you are not actually part of the group until the group leader approves your request. Until you are approved for the group, you will not receive messages for the group. Once you are approved for a group you will receive an email indicating you were approved. You can check to see if you have been approved by going to the My Member Page in QuikKast and clicking on Pending Subscriptions. If the group you elected to join is in the list of groups in Pending Subscriptions, then the group leader has not approved your request as of yet.
If I belong to multiple groups and a message is sent to several of those groups, will I receive the message multiple times?
No. QuikKast recognizes when a message is being sent to multiple groups and will only send the message to a member once, even if the member is in more than one group receiving the message.
Why can’t I send messages to the groups I am a part of?
In order to send messages to a group, you must be the group leader or been enabled by the group leader to send messages. If you are not the group leader and want the ability to send messages, contact your group leader and have them enable you for sending messages to the group.
As a group leader, how do I enable others in the group to send messages?
From the My Leader page, select a group. Within the Members In Group list, click on the ‘+’ sign next to the members name and the symbol will change to an envelope. This indicates they can now send messages to the group. To remove messaging privileges click on the envelope and the plus sign will reappear indicating the member may no longer send messages to the group.
User Guide
Table of Contents
Overview
Registration
Header Bar Navigation
My Member Page
My Leader Page
Send Message
Overview
QuikKast enables organizations to easily communicate with their membership. Within QuikKast, the organization will have various member groups that you can request admission to.
When you join the organization you will automatically be assigned to the All Members group. Based on your gender, you will also be assigned to the All Men or All Women group.
Each group has a group leader. The group leader controls whether or not you are allowed into the group and whether or not you may send messages to the group.
When you join the organization you will establish a profile that sets the methods by which you will receive messages. Messages can be received via email, text message and/or voice call. You can provide an email address, a text message number and a voice number.
You may request to join one or more groups. When you join a group, the request is pending until the group leader approves your request. This ensures the group leader has control over who joins the group.
When a message is sent to a group, for which you are a member, you will receive the message in the manner you have selected in your profile. The group leader simply fashions a message and sends it without any concern for how you will receive the message. Group leaders no longer have to manage contact lists and you no longer have to provide your contact information to everyone who wants to communicate with you.
This is the elegance of QuikKast – communication to multiple individuals that is easy, efficient, and effective.
Registration
You must register for QuikKast and the process is quick and simple. Within your web browser go to www.quikkast.com/qkapp/?organization=YourOrgCode. See your organization’s QuikKast administrator for your organization’s code. You will be presented a login form, which includes a link to register in the lower right corner.

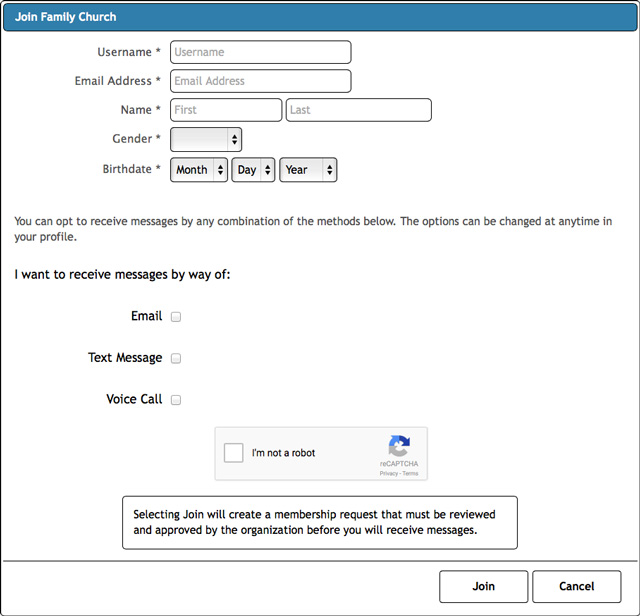
Clicking on Registration will present you with the form below.
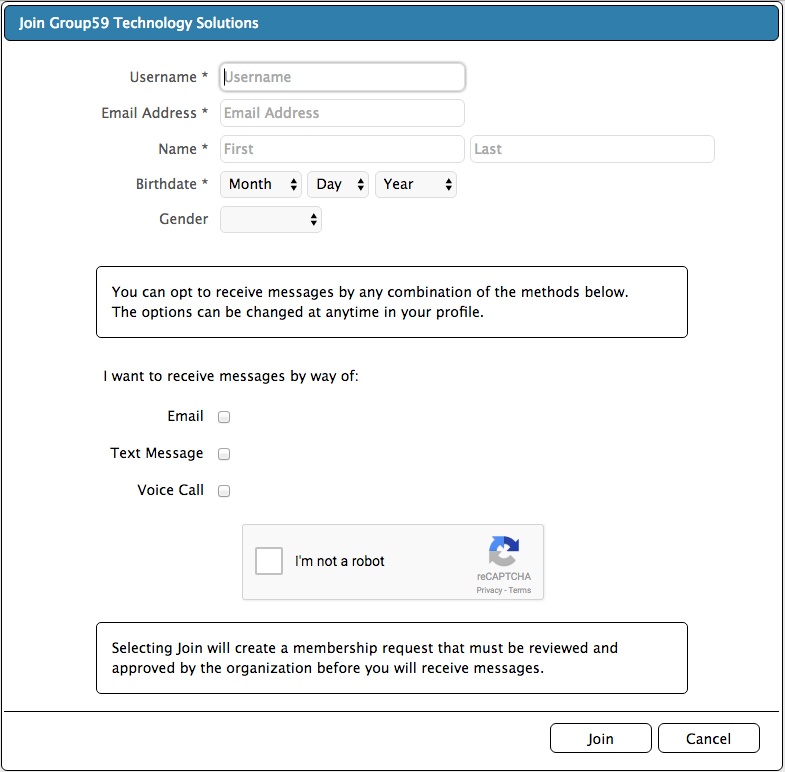
Your text number and voice number may be the same or different.
Birthdate is a required field. This is to ensure group leaders know the age of members requesting group membership in a group that is age restricted. Your birthdate is never displayed to anyone other than you and your organization’s administrator.
You can opt to receive messages in any of the three methods available.
If you have selected Voice Message, you will be able to set do not call times. This will ensure you do not receive a voice call during those times. Any messages sent during those times will be queued and you will receive them once your call times are available.
In the event you forget your password, the login window contains a password reset link in the lower left corner. Selecting the link with present you with a password reset window. Entering your email address and selecting Reset will send you an email with a web link to reset your password.
Header Bar Navigation
Once you have logged into QuikKast you are at the main page and the default view you see will be dependant upon whether you are a Member, Group Leader or Admin. In the upper left corner is a Welcome label followed by your first name. Below that is a link to your profile. Selecting the link will bring up the profile page, where you can change your settings. On the far right side of the header bar is a Log Out link that when selected will log you out of QuikKast.
On the right side of the header bar, and to the left of the Log Out link, will be links to various pages within QuikKast. The links you see will be dependant upon your role as a Member, Group Leader or Admin. Each of the pages is described below.
My Member Page
The My Member Page presents you with the My Groups view. Within My Groups are three tabs – Subscribed To, Not Subscribed To and Pending. Each tab is described below.

Subscribed To
Lists the groups you are subscribed to as a Member. You will receive messages sent to these groups.
You can unsubscribe from a group by selecting the checkbox to the left of the group name and selecting the Unsubscribe button. After unsubscribing from a group, the group will no longer appear in your Subscribed To list and you will no longer receive messages sent to the group.
If you are the group leader for a group, Group Leader will also display to the right of the group name.
In the example above the member is the group leader for all three groups listed.
Not Subscribed To
Lists the groups you are not subscribed to. To subscribe to one or more groups select the checkboxes to the left of the group names and select the Subscribe button. When the Subscribe button is selected, an email is sent to the group leader for all the groups you selected to join. The email informs the group leader of the pending request, letting them know to take action and approve or deny your request to join the group. You will receive an email informing you of their decision. Until you are approved by the group leader, you will not receive messages sent to the group.
Pending
Lists the groups that you have subscribed to, but have not yet been approved for admittance into by the group leader. As described above, a group leader must approve of a member requesting access to a group to ensure a member is not mistakenly joining an incorrect group.
My Leader Page
The My Leader Page is only available if you are a group leader of one or more groups. The page provides you with group membership management.
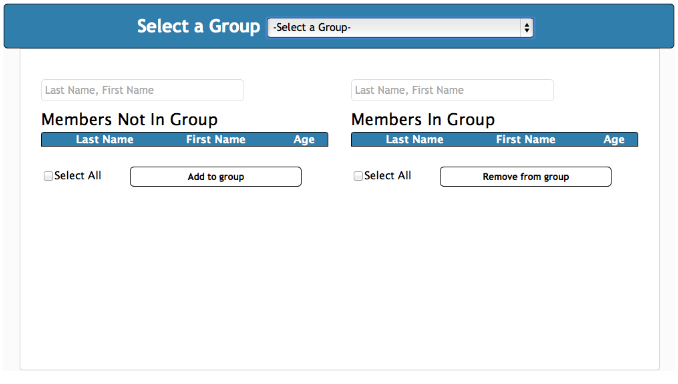
At the top of the page is a selection box which lists all groups that you are the leader of. Once you select a group the two lists will be populated with the members that are not in the group and the members that are in the group. From this page you can perform the following actions:
- Search either list by name by entering any combination of last name and first name (e.g. entering “m, b” will search for anyone with the last name starting with M and the first name starting with B). To search for first name only just enter “, J” . By placing the comma and then a letter, QuikKast knows to only search the first name.
- Add members to a group by selecting them from the Members Not In Group list and selecting Add to group.
- Remove members from a group by selecting them from the Members In Group list and selecting Remove from group.
- Enable members in a group to send messages by clicking on the + symbol next to their name and the symbol changes to an envelope, Click on the envelope to remove the ability to send messages and the symbol goes back to being a + symbol.
Send Message
The Send Message page is only available if you are able to send messages to one or more groups. By default Group Leaders will have the Send Message page. Other members who have been granted Send Message privileges within a group will have the page available as well.
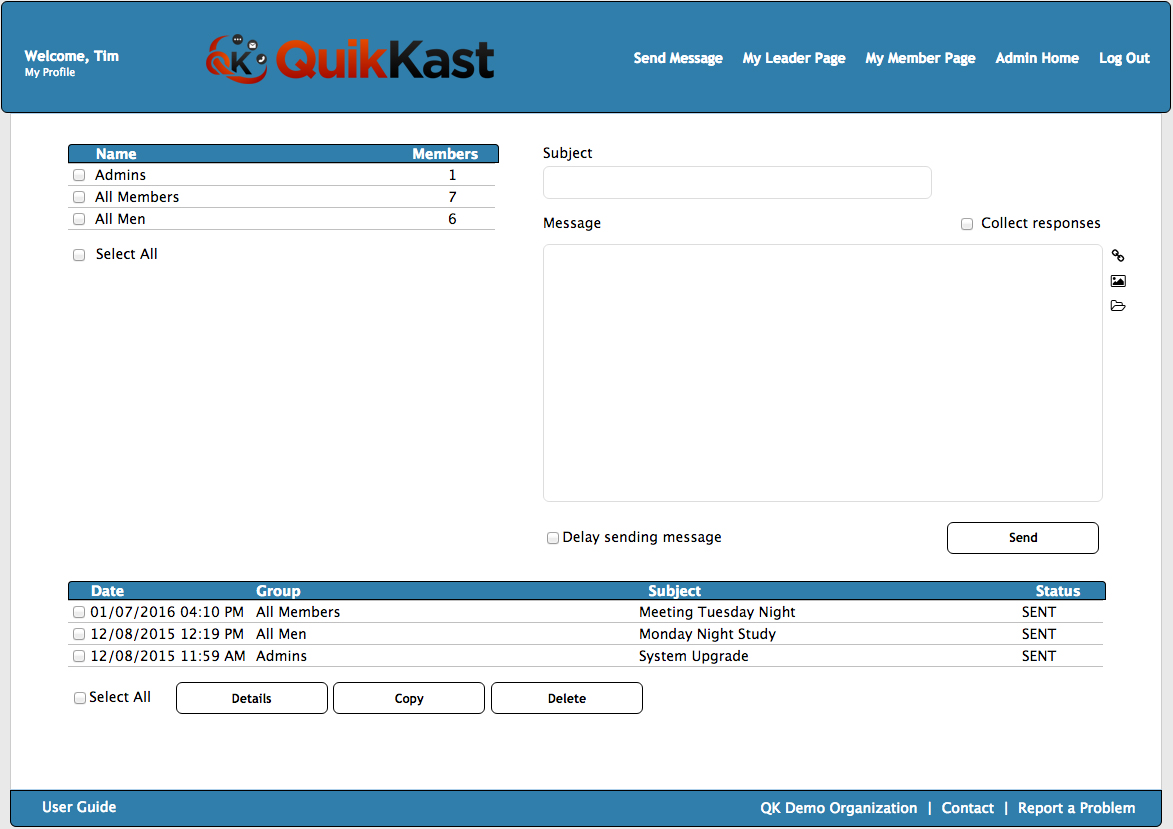
In the upper left of the page is the list of groups you may send messages to. You may select one or more groups to send a message to. To the right of the group list is the message area where you enter the subject and body of your message.
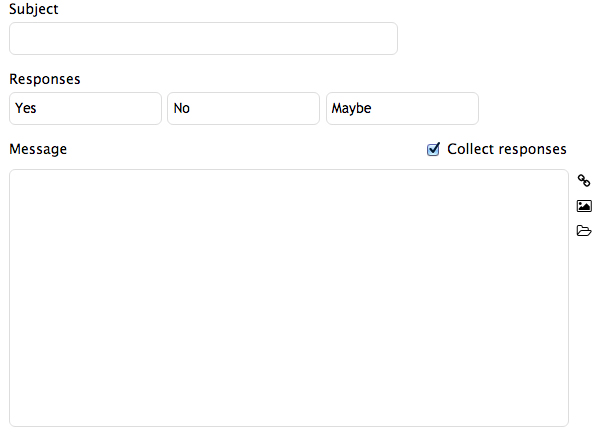
The Collect responses checkbox allows you to enter one to three responses that a member can select to respond to your message. Selecting the checkbox will display the response fields. The boxes will default to Yes, No and Maybe as seen below, but can be changed as you see fit or removed if not needed. To see the responses to your message select the checkbox next to the message and select the Details button. This message Details are described further below.
There are controls to the right of the message body that perform the following actions:
- insert a hyperlink
- attach a file via upload – supported file types are .pdf, .jpg, .gif, .html, .txt and .mp3
- attach a previously uploaded file – your personal folder of uploaded files
After constructing the message, you may send the message immediately or select Delay sending message, which allows you to set the date and time you would like the message sent.
At the bottom of the page is a list of messages you have sent. If you select a message you can review its details, copy the message which enables you to edit the message before sending, and delete the message. You may select All Messages, which limits your options to delete.
When selecting Details, the message details will be displayed. The example below displays the details for a message which collected responses.

There are two links you can select on the Message Details window. The opened link will present you with the following:

The Response Details link will present you with the following:
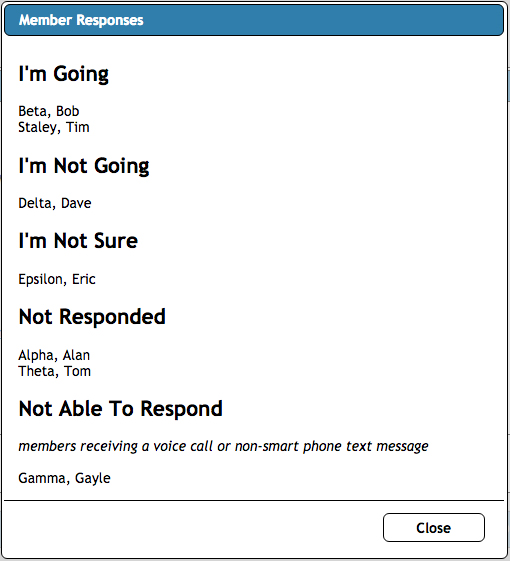
Notice that members who receive your messages by only voice call or text message to a non-smart phone cannot respond to your messages. Sometime members will have an older style flip phone that is able to display hyper-links. Members with this style of phone should adjust their member profile to indicate they have a smart phone. This will enable them to respond to your messages.
Administrator Guide
Overview
Getting Your Members Registered
Registration
Admin Home
Overview
This document only discusses the administrator features of QuikKast. For a complete understanding of QuikKast review the QuikKast User Guide as well.
QuikKast enables organizations to easily communicate with their membership. Within QuikKast, the administrator may create various member groups and assign each group a group leader. An organization will automatically be assigned the following groups, which may not be removed or renamed.
Admins
All Members
All Men
All Women
Every member who joins the organization will automatically be assigned to the All Members group. Based on their gender, they will also be assigned to the All Men or All Women group.
The Admins group is reserved for the assigned administrators of your organization.
For each group created, the group is assigned a group leader. The group leader controls which members are allowed into the group. The group leader always has permission to send the group a message. The group leader may also permit other members of the group to send messages.
Members, who join the organization, establish their profile that sets the methods by which they will receive messages. The member may provide an email address, a text message number and a voice number. The member may opt to receive messages by any of the methods for which they have provided the delivery information (email address or phone number).
Members may join one or more groups. When a member joins a group, the request is pending until the group leader approves the member’s request. This ensures the group leader has control over who joins the group.
When a message is sent to a group, each member in the group will receive the message in the manner they have selected in their profile. The group leader simply fashions a message and sends it without any concern for how the member will receive the message. Group leaders no longer have to manage contact lists!
This is the elegance of QuikKast – communication to multiple individuals that is easy, efficient, and effective.
Getting Your Members Registered
Success with QuikKast requires an active membership. Getting the members of your organization enrolled in QuikKast is the key to improving your organization’s communication. The following steps will help ensure success in getting your members enrolled.
- Get your organization’s QuikKast link onto your church website as quickly as possible. Name the link QuikKast, Stay Connected, Receive Our Communications, or anything which informs the person this is how they can receive your communications. Your organization’s QuikKast link will be quikkast.com/qkapp/?organization=your assigned shortcode. If you do not have your shortcode, you can find it on the Organization page within Admin Home.
- Place an article or flyer in your organization’s weekly/monthly newsletter or bulletin. A sample flyer can be found here.
- If you have the ability to email your membership, send an email with the flyer attached.
- Get your groups and group leaders assigned as soon as possible. Then encourage the group leaders to make use of QuikKast to communicate with their group members. Have them encourage their group members to enroll with QuikKast, so that they can more easily communicate with them. A great tool for getting members enrolled is to have a laptop computer or tablet available to the group leaders, so they can have their members register for QuikKast while in their meeting.
- Import your members from your existing roster. QuikKast provides a sophisticated importer that can import your member information from a CSV file. The importer can be run in trial mode so there is no worry of making a mistake.
- Manually enter your member data. Members can be manually added to the QuikKast system by the administrator.
Once you have a majority of your membership enrolled you will begin to witness the effectiveness of QuikKast.
Registration
A member can register themselves for QuikKast and the process is quick and simple. Be sure to add your organization’s QuikKast link to organization’s website.
www.quikkast.com/qkapp/?organization=your assigned shortcode
The registration window is shown below.
When a member registers you will receive an email similar to the one below:
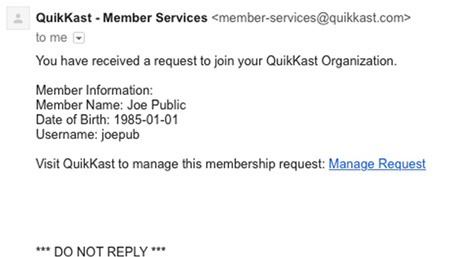
The email includes a link that will take you to your organization’s QuikKast login window.
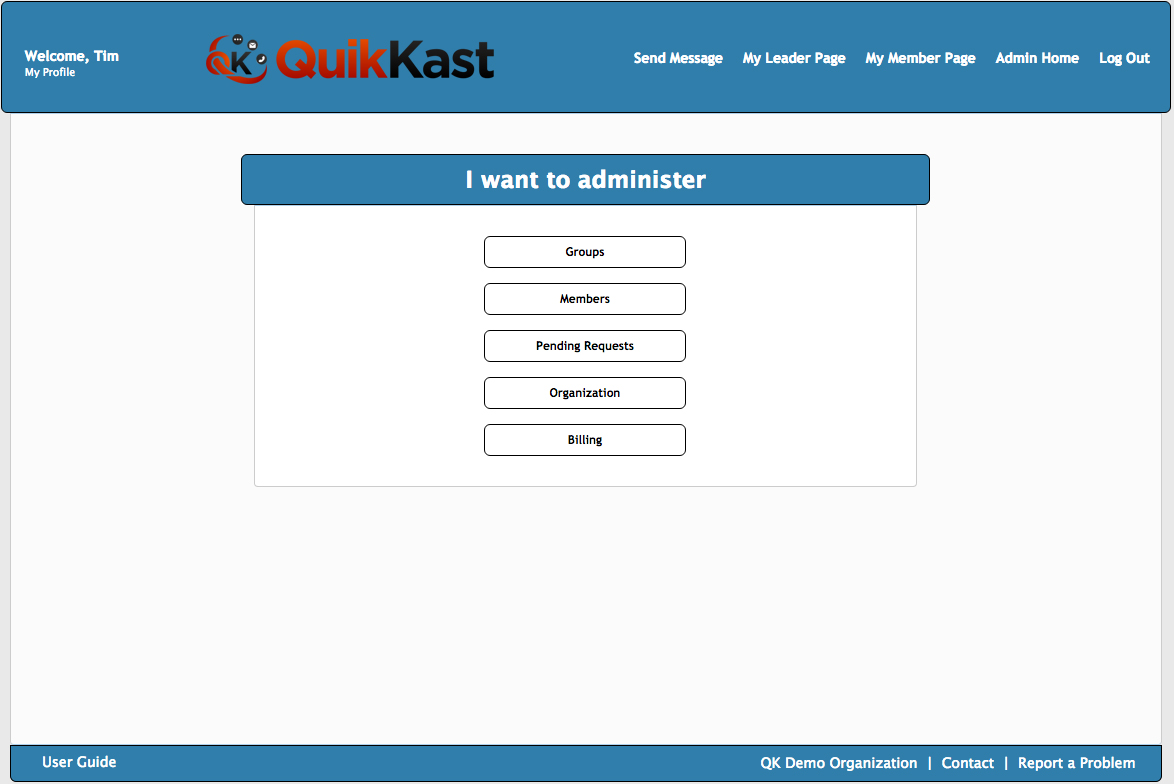
Admin Home
As the administrator, when you log into QuikKast your default page will be the Admin Home page. If there are pending requests for membership, the Pending Requests button will flash orange.
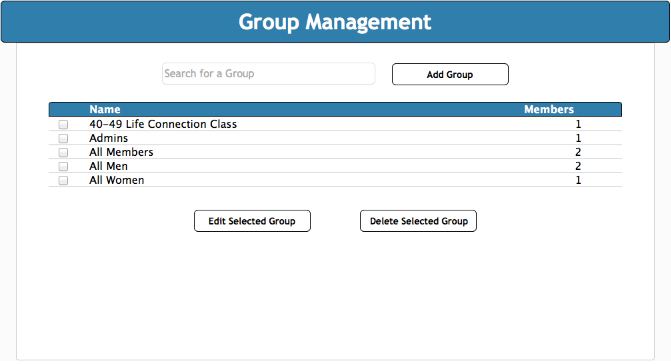
Groups
The groups page allows you to create, modify and delete groups. The page displays the group name and the number of active members within the group. Members pending approval by the group leader are not in the count.
The Admins, All Members, All Men and All Women groups may not be deleted or renamed.
To edit or delete a group select the checkbox next to the group name and select the desired action. Delete will prompt you with a confirmation dialog box to confirm your selection. Deleting the group will remove all members from the group.
Editing a group will present you with the following window.
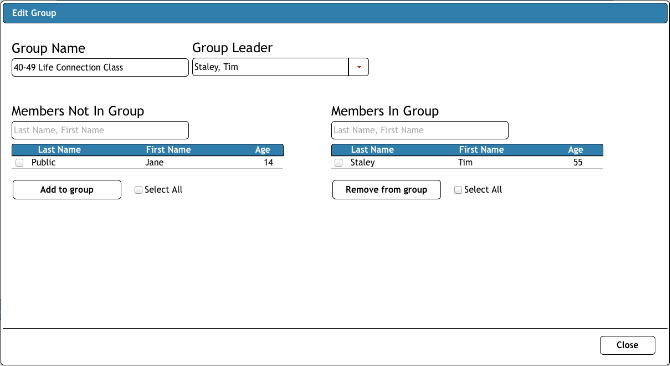
From here you can rename a group, assign the group leader and move members into and out of the group. All groups must have a group leader and you cannot close the dialog if no group leader is assigned. There is no Save button. All moves and changes are saved when Close is selected.
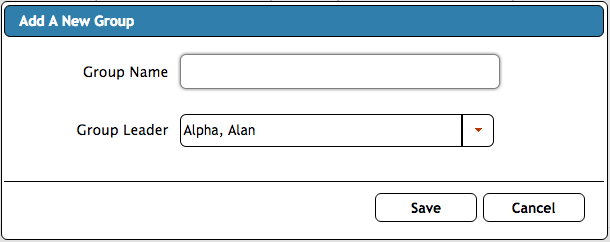
Selecting Add Group will present the following dialog box in which you can enter a group name and select a group leader from the members of your organization. Note: When selecting a group leader for the group, all members may not be displayed. This is because the group leader must have an email address. So, only members with email addresses will displayed for selection.
All actions performed, such as placing members into or out of a group and assigning a group leader will cause emails to be sent to the members involved letting them know of the changes.
Members
The members page enables you add, edit and delete members. Adding or editing a member presents you with the following dialog box.
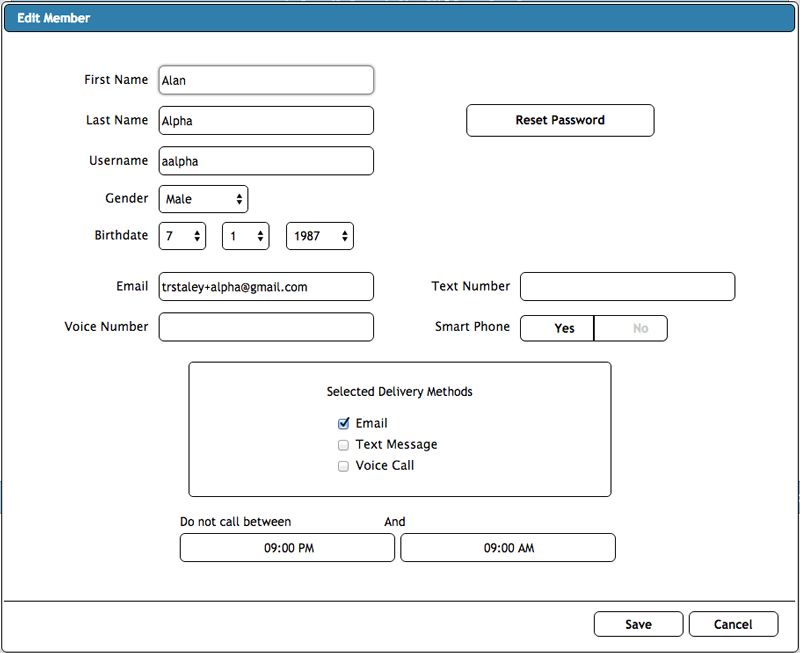
From here you can adjust any settings for an existing member or create a new member. The latter is especially useful for the situation involving a member of your organization that does not have access to a computer or an email address. In those cases you can add the member from this window as an email address is not required from here. You can set them up to only receive voice or text messages. They will not be given a password. At a later point in time, if they obtain an email address all they have to do is have you update their profile with their email address. You can then select Password Reset and they will be emailed the link to set their own password.
Pending Requests
Pending requests lists all the requests for membership into your QuikKast organization. The button will be blinking orange when pending requests are awaiting your action.
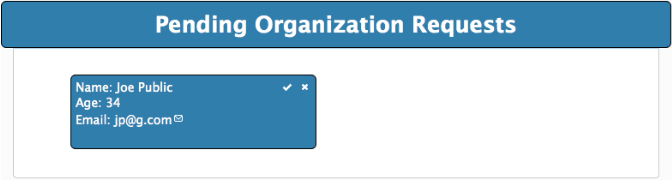
For each pending request you can email the person by selecting the envelope. This is useful if you do not recognize the person and want to converse with them prior to approving them. You will need to supply an email address or phone number to contact you at, if desired, as the person will not be able to reply to the QuikKast email.
Selecting the ‘x’ will deny their request and selecting the check mark will approve their request. In both cases they will send an email informing them of the decision.
Organization
The organization page presents the demographics of your organization. Here you can change the information you need to, and also set the graphic for your organization’s logo to replace the standard QuikKast logo. The logo should be close in size to 340 pixels wide by 100 pixels high.

Billing
The billing page has two tabs. The first is Billing History, which lists your last 12 months billing information. Each line listed also includes a link to the actual invoice.
The second tab is Credit Card. Here you can provide credit card information to pay your monthly invoice automatically. You can also change or remove the card at any time. Invoices paid by credit card will automatically be marked paid. The QuikKast system does not store any credit card information. Credit card information you enter is sent directly to our credit card processor Stripe over a secure link. Stripe is PCI compliant and because we do not store card information in our system your card information cannot be compromised due to a breach of the QuikKast system.
Administrator – Getting Started
In the welcome email you received is the following information:
- your temporary admin password
- your QuikKast website address that is unique to your organization – be sure to bookmark it!
- a link to this document
This document will provide you with a walkthrough of the administrator and group leader roles within QuikKast. As you read through the document, you will be given steps to perform to familiarize yourself with the system.
You can get to the complete documentation set at anytime by clicking on the User Guide link in the lower left corner of all QuikKast web pages.
Admin Role
Please navigate to your organization’s QuikKast website address and login using your selected username and the temporary password provided in your welcome email.
Exercise 1:
Once you have logged in click on the My Profile link in the upper left corner. The My Profile page allows you to edit your profile and change your password. The My profile is available to all your Members so that they can set their profile preferences.
Take a moment to setup your profile in the manner you prefer. Once you have done so be sure to click the Save button.
It is recommended that you change your temporary password now by clicking Change Password.
You should now have your profile set the way you prefer. You can still change it at anytime. Also, you should have changed your password in order to invalidate the temporary password.
The menu items across the top are all available to you at this point. This is because you are currently an administrator, a group leader and message sender. The My Member Page menu item is available to all members at all times.
QuikKast allows for multiple administrators. As the administrator you can allow others to serve as a QuikKast administrator as well. You will see how to do this later on.
Key point – If an administrator is not a group leader of any group, they will not have the My Leader Page menu item. Also, if they do not have messaging privileges within a group they will not have the Send Message menu item.
When a user logs in they will only be presented with the menu items that apply to them. Thus if the user is not an administrator they will not see the Admin Home menu item. Likewise if the user is not a group leader, they will not see the My Leader Page menu item
Exercise 2:
Now click on the Admin Home menu item. Then click on the Groups button. You will see that your organization already has four groups: Admins, All Members, All Men and All Women.
Because you are the organization’s admin and the only member of the system, you have been made the group leader of those groups. You can assign a new group leader to any of these four groups at any time, once you have other members in the system. However, you cannot change the names of these four groups, as they are required by the system. Any groups you add can have the names changed at any time.
Take a moment to add a group and delete a group in order to get familiar with how to do so.
You may have noticed that your profile defaulted you to a Male, and you may be a Female. In either case, you are currently a member of one of the two gender based groups that you may not want to be a member of. You will have to assign a new group leader to the group if you wish to remove yourself from the group. This is because a group must always have a group leader. And since the system only had one member available when the groups were created, the first admin was made the leader of all system groups.
Click on Admin Home again. Now click on Members. You will see that you are the only member of your organization. Here you can manually add members or import members. The preferred method for adding members to your organization is to have the members register themselves by going to your organization’s QuikKast link and selecting register or by importing them using the QuikKast import utility. We will visit the Add Member and Import Members buttons later on.
Exercise 3:
Return to Admin Home if you are not already there.
When a person registers, you and the other administrators will receive an email informing you/them that a person has requested admission into your organization’s QuikKast system. Clicking on the link in the email will take you to your organization’s QuikKast link, where you can log in. When you login you will see the Pending Requests button flashing orange. This lets you know that people are requesting membership in your organization.
Let’s have some fun for a moment. Log out of QuikKast and register a phony member. You can make up any email address, but it would be wise to enter one that is not likely someone else’s real email address. Once you have completed the registration you will see a message stating your request has been emailed to the organization’s QuikKast administrator.
Now, as the admin, go check your actual email. You should have received an email with a member request. If you do not see the email, be sure to check your spam folder. Click on the link in the email. You will be taken to your Organization’s QuikKast login. Go ahead and login with your admin credentials. You should see the Pending Requests button flashing orange. Go ahead and click on it. You see the request.
In the upper right corner is a ‘check mark‘ and an ‘x‘. Clicking on the ‘check mark‘ will approve the member and automatically add them to the All Members group, and the All Men or All Women group based on their gender. They will also receive an email with instructions for creating their password and logging in.
Clicking on the ‘x‘ will deny their admission and send them an email informing them they have been denied, along with instructions for contacting the organization if their denial was in error.
You will also notice the ‘envelope icon‘ next to their email address. If you are not sure of who the person is, you can click on the envelope and email them a message to verify who they are. You will need to include an email address or phone number within the message that the person can contact you at, since the email they will receive from QuikKast cannot be replied to.
Until you approve the member by clicking on the check mark, the member is not actually part of your organization and will not be a part of any groups and thus not receive any messages.
Go ahead and click on the check mark. Now go back to Admin Home and select Members. You see that the person you approved is now in your organization.
Click on Admin Home and select Groups. Now select All Members and click on Edit Selected Group. You see that the member you approved is part of the group. Click on the Close button.
Now look to see if they were added to the All Men or All Women group.
You can remove a member from a group at any time. Go ahead and edit one of the groups and remove the member from the group.
Go back to Admin Home and select Members again. Check the person you created and select Delete Member. Now confirm the delete action.
The person you added is now removed from your organization. Take a moment to go look at the groups and you will see they are no longer a member of any groups. The person has been completely removed from your organization. When you selected delete, they were sent an email informing them they were removed from you organization.
Exercise 4:
Go back to Admin Home and now select Organization. Here you can change the demographics of your organization and set your own custom logo, which will appear at the top of all QuikKast pages and on the registration/login page. On this page you see the current number of members in your organization. Your QuikKast Number is the phone number uniquely assigned to your organization for delivering messages.
One item of note is the Member Minimum Age. The default setting is 14. You can set this to any age you like. Doing so will not allow anyone who is younger than the minimum age to join the organization. This is determined by the birthdate the person entered at the time of registration.
It was mentioned earlier that the customary way to have members become part of your organization is to have them register through your QuikKast web link. An alternative method is to manually create the members.
Return to Admin Home if you are not currently there. Click on Members. Now click on Add Member. Here you can add members manually. If no email address is entered, the member will not receive any email notifications regarding their membership status, such as being added to groups or removed from groups.
There are two common cases for adding members manually.
- Case 1: A member does not have an email address and may only have a home phone. You can manually add them and enter their voice number. Then check Voice Call as the method by which they will receive messages.
- Case 2: You have a set of members you want to add immediately to jumpstart the use of QuikKast and you have the contact info for those members and wish to manually enter their information.
Lastly, you can make use of the excellent import feature of QuikKast to bulk load members. Click on the Import Members button to see the detailed instructions. This is a great way to jumpstart your use of QuikKast.
Members added manually or imported, that have an email address assigned in QuikKast, will receive an email with a link that will allow them to set their password and then log in to QuikKast and manage their own profile going forward. Members with email addresses can always go to your organization’s QuikKast link and request a password reset, should they ever forget it.
This completes the Admin Role.
Group Leader Role
If you are not logged into your organization’s QuikKast site, go ahead and do so now.
Exercise 5:
To follow along completely in this section, manually create a phony member. If you cannot recall how to do so, go the Admin Home Page, click on Members and then click on Add Member. Add a member. Be sure to only enter a voice number, so as not to accidentally email someone, and select only the Voice Call delivery method. Once you have successfully added the member, edit the member and uncheck their voice delivery method and remove the phone number as you will not be sending this member any actual messages. You must supply a deliver method when adding a member. However, a member may no longer want to receive your messages and thus we allow all delivery methods to be disabled.
Now go back to Admin Home and click on Groups. Click on Add Group and create a group named Temp and set yourself as the group leader.
Click on the My Leader Page menu item. Now select the temp group you just added from the group selection drop down box.
The list of groups that will appear in the dropdown box will be all the groups the member is the leader of.
You will notice that you are the only member of the group. You can manually place members in your group at any time. Members placed in the group by you will receive an email (if they have an email address in QK) indicating they have been added to the group. Even though you may add members to a group, members can choose to remove themselves from a group at any time. The usual workflow is for users to request membership in a group, which is reviewed in the User Guide section of this document.
Go ahead and add the phony member you created to your temp group. You do so by selecting the checkbox next to their name clicking Add to group.
Exercise 6:
The phony member is now in the temp group. You will notice there is an envelope next to your name and a + sign next to the phony member’s name. The envelope indicates that you have messaging privileges for this group. By default, the group leader always has messaging privileges for the group. The group leader can elect to allow others in the group send messages by clicking on the + sign next to their name.
Go ahead and click on the ‘+’ sign next to the phony member’s name. You will see it changed to an envelope. The phony member can now send messages to the temp group as well.
Click on the envelope next to the phony member’s name. Notice how it changed back the + sign. Now the phony member can no longer send messages to this group.
As you can see, the group leader has total control over what members within the group can send messages to the group.
Go ahead and remove the phony member from your group. It should be clear how to do so, but if you are unsure just click on the checkbox next to their name and click on Remove from group.
While it is not demonstrated in this tutorial, members who request admission to a group will display at the top of the Members Not In Group list. Their names will be in red and you will have the opportunity to click an x, which will deny their request or select the checkbox and Add them to the group. In each case, an email is sent to the member informing them of their acceptance into, or denial from, the group.
These are considered pending requests, and when you enter the My Leader Page, a count of pending requests will display to the right of the group dropdown box. Clicking on the dropdown box will show your list of groups and the number of member requests will be next to each group. This makes it easy to know which groups need attention.
We have finished with the phony member. At this time you may go to Admin Home and select Members and delete the phony member from your organization.
This completes the Group Leader Role.
If you have completed the exercise, you should be off and running! If you need further assistance you may email us at support@quikkast.com or reference the other guides within this documentation.
Table of Contents
FAQs
User Guide
Administrator Guide
Administrator – Getting Started